Architechnics, Inc. is a company based out of Quincy IL that offers complete building design and planning services. This all includes architecture, cost estimating, structural design, mechanical and electrical design, facilities planning, and complete interior design.
This is a company that i am trying to get a job with and be their personal landscape architect, since currently there is a licensed architect doing the landscaping plans. They have some great projects and have a sketchup program that is alot better then sketchup called BIM or Building Information Modeling that creates a working digital representation of the physical and functional characteristics of the building.
Here is the link if you want to check out their work
Architechnics, Inc.
Wednesday, December 1, 2010
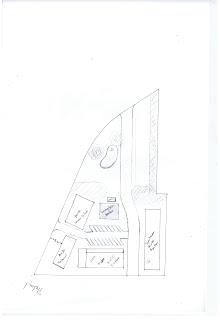
Sections of the Master Plan
The drawing presented in this post are the sections that i drew for the Whitfield Design. The area that is drawn is located on the map of the master plan located on the page.
The first Section (Section 1) is a sketch of the road layout. It includes a 20 foot wide road with 5 foot sidewalks located right next to the road. One thing that i would like to change after i drew this was the placement of the sidewalk. I wish i would of realized that i was wanting to place a vegetative strip in between the road and the sidewalk, and as i was drawing i guess i overlooked that and forgot all about it.
The second section (View of the Courtyard) is one of the sections that i think really gets the point of the courtyard across. The courtyard is a private community space, meaning that is there for the community to know that it is there but it is not seen from the road or street inviting everyone in. This section shows how ther Gravel seating area seperates the parking area from the rest of the courtyard. This also shows how the stormwater storage area works with the steps leading down into a sunken grass space. This is a great area for sitting or even having some type of movie night by bringing out a sheet with a projector. One could place the projector on the end with the firepit and shine it across the sunken to the sheet hanging by the gravel seating area. That way the firepit could be lite and used as a grill for cooking.

Section 3 (Section 3) is a section cut through the public community area. This is showing how the open space realtes to the houses outlining the space. I think that could be more varaition in the planting material and height contrast of the buildings but i like how it all worked out.

Illustrative Details
For the Whitfield Design we were asked to draw some illustrative details for some of the elements that were added for the design.
On the top left is an illustration of a green roof section. These green roofs will be located on all of the houses and buildings on the site. The structure will need a little bit more support than a traditional roof. The illustration shows that there will be plant medium, drainage material, and roof barrier medium to protect the structure from leaks.
On the bottom of the page is a parking structure that i designed to be place over the parking stalls. The structure will be 10 feet tall on the left side and rise to 13 feet tall on the right side. With this angle it will encourage vines to grow on the latice work place on top. Also with this angle solar panels can be attached to the upper side. The solar panels could be used to power lights that would be on the underside of the parking structure or shining out into the sidewalk on the left side.
On the top right, there is an image of the solar tree that i found for the playground area. This solar tree looks similar to an actual tree and the leaves mimic how leaves actually operate. The leaf looking structures in the drawing include solar panels on the top with led lights on the underside of them. The solar tree is completely off the grid, which means that no single person would be responsible for the electric bill.

Sun Shade Study
During the sun shade study, i realized that i should of done this study a lot earlier in the design process because during the winter months i realized that i should of changed a few buildings around to create some more sun into some areas.
The images of the model in the previous post showcases the sun and shade amounts on the site.
Below is a sheet that shows the model with sun and shade at the equinoxes and solstices.

The images of the model in the previous post showcases the sun and shade amounts on the site.
Below is a sheet that shows the model with sun and shade at the equinoxes and solstices.


Perspectives number 2
Here are six more perspectives of the site
Top Left
This is a view looking at one of the larger buildings on the site that would have 4 apartments in each building. this shows balcony access to the second floor apartments by a staircase located in between the buildings. each building has balconies that encase the building. This provides plenty of seating out side for the residents to enjoy the afternoon/evening sun.
Top Middle
This is a view from the corner of Whitfield and Scales Street of the mixed use building. The building could have a sandwhich shop or a restautant and provide seating outdoors for the patrons to eat outside.
Top Right.
This is a birds eye view of the northern portion of the site with the the private community space. The Parking structure which is located in the bottom of the image has plant material growing on it and potentially have solar panels that would supply power to lights that would be in the parking structure.

Bottom Left
This is another view looking into the playground splash fountain area. This view has the solar tree located adjacent to the playground and splash fountain to provide light in the evening and create interest in the area.
Bottom Middle
View looking at the entrance to the community center, showcasing the balcoiny on the second floor.
Bottom Right
A view looking from Whitfield street at the devlopment and what one of the houses might look like driving by. You can see the street trees that would provide a calming and speed control effect on drivers.
Perspectives 1
Below are pespectives for 6 areas on the site. I am going to start with the top row.
Top Left is an image of the community gardens, the closest part of the image has raised planters- i chose to use raised planters because i am a person that has back problems and i do not like to have to been all the way to th eground to pick vegetables, with the raised planters my self or even the older generation could sit on the edge and reach in to pick their peppers or carrots instead of having to bend over or even sit on the ground to pick them. i have also included an area righ behind the raised planters for gardens that are placed on the ground that could be tilled up for bigger gardens.
Top Middle-
Is view looking at the corner building, which is mixed use and could have a restaurant like Mugshots, where they have the balcony for people to eat on or even like Bin 612 where they have the patio for outside eating
Top Right
Is a view looking at the arbors and seating arear located between the community gardens and the playground area. These are round seating structures that could have public art display in the center of the circle to draw attention to this area.

Second Row
Bottom Left
Is a view looking to the south in the private community area, looking at the sunken turf stormwater retention area located next to a seating area. The seating area is providing two things: 1 is that is provides seating and 2 is that is breaks up the space from the parking lot to the well water feature creating its own space.
Bottom Middle
This is a view of the splash fountain and the playground area. The splash fountain would utilize capturing stormwater runoff and filtering and reusing it for the kids to play in. The playground is all recycled material, and the reason for this in the design, is so that while the parents are over in the community gardens the children can be outside with them playing on the playground.
Bottom Right
This is a view of the well water feature. It has seats with a planted wall behind the seats to create some contrast and create conversation
Enlarged master plan
In the image below i have labled some things on the image, but there are some interesting things that i would like to point out on top to draw your interest to. In one of the first posts that i put on this blog was about a solar tree. I thought these were really interesting because they were completely off the grid by using solar panels on top of the leaf and led's underneath to create light in the evening. I have included two solar trees in my design and they are located right next to the playground and splash fountain. This allows the playground to have plenty of light in the evening for children to come out on the hot summer nights and play on the playground and enjoy the water from the splash fountatin.
I have also included community gardens, seating area next to the well water feature, and next to the parking structures.

I have also included community gardens, seating area next to the well water feature, and next to the parking structures.

Master Plan
Oh the master plan, it was fun completing and seeing how things worked out. If you were to click on the image, you can see the labeling a little more clearly.
From the preliminary plan to the master plan i realized that having the turn around lane, which was going to be one way with a playground and a communtiy garden in the middle of it, needed to change. I was asked why i was designing a playground where children would have to cross a road to get to it. It was a great point and i was able to adjust some of the buildings around to make up for the parking i was going to have to change. I moved half of the parking spots up on to the other side of two of the buildings which made the existing parking area bigger and function bettter. The other parking section i moved out to Scales Street and created 60 degree parking coming from the east.
The plan turned out great i think and i am very happy with the project.

Preliminary Plan
You may be asking why there are not conceptual plans in this blog before preliminary plans, and that is because there are none. I have found that i need to keep all my drawings in a safe place in my desk and not in a recycling bin underneath my desk, because the good people around me that like to recycle, kindly empty the container once it gets full. I forgot that i was placing my drawings in there instead of keeping them, so i did not throw them away, i recycled them. At least i was helping out the landfills, but at the same time i was hurting the grade, OH well. Actually i found one drawing and here it is.
 To the preliminary plan. I actually changed my conceptual plans alot to come up with this design. In the image below one can see that there are two entry points. One on Scales Street and one from Whitfield street on the northern end of the site. I changed the road layout from the functional plans a little, by taking out one of the entrances on Scales Street, i ended up creating a turnaround located close to the community center.
The plan has quite a few houses on the the site with the majority of the housing being two story. There are four buildings that are single story. At first i thought this would add some change in perspective as people walked throught the site, but after making a 3d sketchup model i realized that it would be beneficial to have all of them the same height to close in the space.
The plan has some great things in it but a few things that need to be changed which i will address when i post the master plans.

Functional Diagrams and Matrix
Below are my three functional plans. I have them in order of 1 (just below and to the left), 2 (just below and to the right), and 3 (is in the second row).
As you can see from the three plans that i was playing with different entrance points and road layouts and those are symbolized by the black dashed lines. I was also looking at different locations for the community center and how they would work out the the corner view from Whitfield and Scales Streets.
Below in the second row on the right is a matrix and i will describe how i came to the conclusion on which functional plan i used below.


Matrix
This matrix may not look like it compares much except that i like drawing stars, triangles and circles. It actually compares the program elements that i thought were the most important. It may look like that there are not much differences but i by looking at the functionals, i started to like one more than the others.
I ended up choosing functional plan #3 because of the road layout, but with one minor change. i would remove the road that leaves the site to the west. I was not set on this entrance because across the street is another road entering Whitfield, and i did not want to have to add a stop sign here.
Concept and Diagrammatic relationships
Concept

•Regenerative
–The ability to use green technologies on the site to help the residents financially and environmentally
–Conversion, Distribution, Filtration, Assimilation, and Storage
•Examples are:
–Distribution
•Collecting Rainwater runoff into cisterns to be reused as irrigation, filtered and used in the water features and even used to wash vehicles.
–Conversion
•Capturing the suns power through solar panels on the roof and in the solar tree will cut down on the homeowners utility costs.
–Assimilation
•Through the community garden residents can plant what they want and all that is asked is that all of the organic waste from making dinner be contributed back to the composting area to help grow the next years crop.
Below is an image of my diagrammatic relationships which is just saying how i relate some of the program elements, that i posted on the previous blog, to each other

Whitifeld Design Program
The pages below are lists of program elements that i have broken out with an idea and how it would work on the site. There is categories of housing ideas, stormwater and parkming structure on one page and on the other is a list of design ideas i had for the community area, streets and private areas.


Subscribe to:
Posts (Atom)